VisionSOM-6ULL - USB recovery mode: Difference between revisions
From SomLabs Wiki
Created page with "{{PageHeader|VisionSOM-6ULL - USB recovery mode}} __FORCETOC__ == VisionSOM – boot modes == center The carrier board [https://wiki.soml..." |
|||
| (3 intermediate revisions by the same user not shown) | |||
| Line 8: | Line 8: | ||
The carrier board [https://wiki.somlabs.com/index.php?title=VisionCB-STD VisionCB-STD v.2.0 or later] is equipped with additional boot selector (''Figure 1'') which allows to override the normal boot flow and force a boot to the ''USB recovery mode''. | The carrier board [https://wiki.somlabs.com/index.php?title=VisionCB-STD VisionCB-STD v.2.0 or later] is equipped with additional boot selector (''Figure 1'') which allows to override the normal boot flow and force a boot to the ''USB recovery mode''. | ||
[[Image: | [[Image:VisionSOM-6ULL_-_USB_recovery_mode_img1.jpg|center|500px]] | ||
<center>Figure 1. VisionCB-STD v2.0 – boot selector</center> | |||
Figure 1. VisionCB-STD v2.0 – boot selector | |||
| Line 17: | Line 15: | ||
<center> | |||
{| style="border-spacing:0;width:9.29cm;" | {| style="border-spacing:0;width:9.29cm;" | ||
|- | |- | ||
| Line 36: | Line 34: | ||
|- | |- | ||
|} | |} | ||
</center> | |||
=== Internal Boot === | === Internal Boot === | ||
| Line 54: | Line 52: | ||
Because ''Serial Downloader'' mode allows to setup communication with a ''VisionSOM-6ULL'' module even without a working bootloader it can be used to recover your device when bootloader has been erased from the storage media (or written with an invalid/corrupted image) and also in cases when the board is new (a board from production with no ''u-boot'' yet) or when you are developing ''u-boot''. The ''Serial Downloader'' mode is often called "''Recovery Mode''". | Because ''Serial Downloader'' mode allows to setup communication with a ''VisionSOM-6ULL'' module even without a working bootloader it can be used to recover your device when bootloader has been erased from the storage media (or written with an invalid/corrupted image) and also in cases when the board is new (a board from production with no ''u-boot'' yet) or when you are developing ''u-boot''. The ''Serial Downloader'' mode is often called "''Recovery Mode''". | ||
== VisionSOM-6ULL – recovery mode == | == VisionSOM-6ULL – recovery mode == | ||
| Line 61: | Line 58: | ||
[[Image: | [[Image:VisionSOM-6ULL_-_USB_recovery_mode_img2.jpg|center|500px]] | ||
<center>Figure 2. VisionCB-STD v2.0 – Serial Downloader mode</center> | |||
In the next step, connect the USB cable to the ''USB-OTG'' connector on the ''VisionCB-STD'' carrier board and to your host computer. Make also sure that USB serial cable is connected between board (''Linux Console ''connector) and your PC. Now, power up the board and open a serial terminal at 115200 8N1. If all steps mentioned above are correct, your host PC should detect new HID compliant device. For Linux host systems you can easily check it with ''lsusb'' command: | In the next step, connect the USB cable to the ''USB-OTG'' connector on the ''VisionCB-STD'' carrier board and to your host computer. Make also sure that USB serial cable is connected between board (''Linux Console ''connector) and your PC. Now, power up the board and open a serial terminal at 115200 8N1. If all steps mentioned above are correct, your host PC should detect new HID compliant device. For Linux host systems you can easily check it with ''lsusb'' command: | ||
[lskalski@archlinux]$ lsusb | |||
[lskalski@archlinux]$ lsusb | ... | ||
... | Bus 004 Device 001: ID 1d6b:0003 Linux Foundation 3.0 root hub | ||
Bus 004 Device 001: ID 1d6b:0003 Linux Foundation 3.0 root hub | Bus 003 Device 005: ID 056d:4026 EIZO Corp. | ||
Bus 003 Device 005: ID 056d:4026 EIZO Corp. | '''Bus 003 Device 008: ID 15a2:0080 Freescale Semiconductor, Inc. ''' | ||
'''Bus 003 Device 008: ID 15a2:0080 Freescale Semiconductor, Inc. ''' | Bus 003 Device 001: ID 1d6b:0002 Linux Foundation 2.0 root hub | ||
Bus 003 Device 001: ID 1d6b:0002 Linux Foundation 2.0 root hub | ... | ||
... | |||
To upload new bootloader through USB and ''Serial Download Protocol'', users need to install additional software - ''MFGTool'' (official, well-documented tool provided by NXP, but available only for Windows OS) or ''imx-usb-loader'' (unofficial, cross-platform tool available for Linux, Windows and macOS systems). In this tutorial we will focus on ''imx-usb-loader'' tool. | To upload new bootloader through USB and ''Serial Download Protocol'', users need to install additional software - ''MFGTool'' (official, well-documented tool provided by NXP, but available only for Windows OS) or ''imx-usb-loader'' (unofficial, cross-platform tool available for Linux, Windows and macOS systems). In this tutorial we will focus on ''imx-usb-loader'' tool. | ||
| Line 81: | Line 77: | ||
Compiled version of ''imx-usb-loader ''sources provide two binaries: ''imx_usb'' and ''imx_uart'' for the two supported connections. To run ''imx_usb'', you will need to have ''libusb'' installed on your machine. To compile it, you will need also the ''libusb'' headers. Linux users can easily install ''libusb'' headers by grabbing the ''libusb-1.0-0-dev'' package: | Compiled version of ''imx-usb-loader ''sources provide two binaries: ''imx_usb'' and ''imx_uart'' for the two supported connections. To run ''imx_usb'', you will need to have ''libusb'' installed on your machine. To compile it, you will need also the ''libusb'' headers. Linux users can easily install ''libusb'' headers by grabbing the ''libusb-1.0-0-dev'' package: | ||
[lskalski@archlinux]$ sudo apt-get install libusb-1.0-0-dev | |||
[lskalski@archlinux]$ sudo apt-get install libusb-1.0-0-dev | |||
In the next step, clone ''imx-usb-loader'' project sources from ''GitHub'' [3]: | In the next step, clone ''imx-usb-loader'' project sources from ''GitHub'' [3]: | ||
[lskalski@archlinux]$ '''git clone git://github.com/boundarydevices/imx_usb_loader''' | |||
[lskalski@archlinux]$ '''git clone git://github.com/boundarydevices/imx_usb_loader''' | Cloning into 'imx_usb_loader'... | ||
Cloning into 'imx_usb_loader'... | remote: Counting objects: 877, done. | ||
remote: Counting objects: 877, done. | remote: Compressing objects: 100% (12/12), done. | ||
remote: Compressing objects: 100% (12/12), done. | remote: Total 877 (delta 7), reused 12 (delta 5), pack-reused 860 | ||
remote: Total 877 (delta 7), reused 12 (delta 5), pack-reused 860 | Receiving objects: 100% (877/877), 334.61 KiB | 600.00 KiB/s, done. | ||
Receiving objects: 100% (877/877), 334.61 KiB | 600.00 KiB/s, done. | Resolving deltas: 100% (550/550), done. | ||
Resolving deltas: 100% (550/550), done. | |||
and compile it using ''make'': | and compile it using ''make'': | ||
[lskalski@archlinux]$ '''cd imx_usb_loader/''' | |||
[lskalski@archlinux]$ '''cd imx_usb_loader/''' | [lskalski@archlinux]$ '''make''' | ||
[lskalski@archlinux]$ '''make''' | cc -c imx_usb.c -o imx_usb.o -pipe -ggdb `pkg-config --cflags libusb-1.0`-Wstrict-prototypes | ||
cc -c imx_usb.c -o imx_usb.o -pipe -ggdb `pkg-config --cflags libusb-1.0`-Wstrict-prototypes | cc -c imx_sdp.c -o imx_sdp.o -pipe -ggdb -Wall -Wstrict-prototypes | ||
cc -c imx_sdp.c -o imx_sdp.o -pipe -ggdb -Wall -Wstrict-prototypes | cc -c imx_sdp_simulation.c -o imx_sdp_simulation.o -pipe -ggdb -Wall -Wstrict-prototypes | ||
cc -c imx_sdp_simulation.c -o imx_sdp_simulation.o -pipe -ggdb -Wall -Wstrict-prototypes | cc -c imx_loader_config.c -o imx_loader_config.o -pipe -ggdb -Wall -Wstrict-prototypes | ||
cc -c imx_loader_config.c -o imx_loader_config.o -pipe -ggdb -Wall -Wstrict-prototypes | cc -o imx_usb imx_usb.o imx_sdp.o imx_sdp_simulation.o imx_loader_config.o `pkg-config --libs libusb-1.0` | ||
cc -o imx_usb imx_usb.o imx_sdp.o imx_sdp_simulation.o imx_loader_config.o `pkg-config --libs libusb-1.0` | cc -c imx_uart.c -o imx_uart.o -pipe -ggdb -Wall -Wstrict-prototypes | ||
cc -c imx_uart.c -o imx_uart.o -pipe -ggdb -Wall -Wstrict-prototypes | cc -o imx_uart imx_uart.o imx_sdp.o imx_loader_config.o | ||
cc -o imx_uart imx_uart.o imx_sdp.o imx_loader_config.o | |||
Windows users can build ''imx-usb-loader'' tool using ''Visual Studio'' (subdirectory ''msvc/'' contains the project files for ''Visual Studio 2015'') or ''MinGW'' (which allows to use the GNU toolchain to compile a native Microsoft Windows application). In both cases, please make sure that you have a compiled copy of ''libusb'' available. | Windows users can build ''imx-usb-loader'' tool using ''Visual Studio'' (subdirectory ''msvc/'' contains the project files for ''Visual Studio 2015'') or ''MinGW'' (which allows to use the GNU toolchain to compile a native Microsoft Windows application). In both cases, please make sure that you have a compiled copy of ''libusb'' available. | ||
| Line 116: | Line 106: | ||
By default, ''imx-usb-loader'' simply loads a named file into RAM and executes it. On the host machine - as root - run the ''imx_usb'' tool with the binary u-boot file (you can use ''u-boot.imx'' binary fil''e ''from [https://wiki.somlabs.com/index.php/VisionSOM-6ULL_Buildroot_Developer_Guide Buildroot image] [4]) as parameter: | By default, ''imx-usb-loader'' simply loads a named file into RAM and executes it. On the host machine - as root - run the ''imx_usb'' tool with the binary u-boot file (you can use ''u-boot.imx'' binary fil''e ''from [https://wiki.somlabs.com/index.php/VisionSOM-6ULL_Buildroot_Developer_Guide Buildroot image] [4]) as parameter: | ||
[root@archlinux imx_usb_loader]# '''./imx_usb uboot.imx''' | |||
[root@archlinux imx_usb_loader]# '''./imx_usb uboot.imx''' | |||
If everything goes as planned (using USB your device should be detected automatically using the USB VID/PID), the serial terminal shows the device starting ''u-boot'' (output on the serial console), for example: | If everything goes as planned (using USB your device should be detected automatically using the USB VID/PID), the serial terminal shows the device starting ''u-boot'' (output on the serial console), for example: | ||
<pre> | |||
U-Boot 2016.03 (Feb 06 2018 - 00:58:21 +0100) | U-Boot 2016.03 (Feb 06 2018 - 00:58:21 +0100) | ||
| Line 136: | Line 120: | ||
MMC: FSL_SDHC: 0 | MMC: FSL_SDHC: 0 | ||
... | ... | ||
</pre> | |||
Now you can ''unbrick'' your device by uploading new bootloader/image (using for example TFTP server – please visit [https://wiki.somlabs.com/index.php/How_to_write_image_to_VisionSOM-6ULL_eMMC_on_Windows_and_Linux “How to write image to VisionSOM-6ULL eMMC on Windows and Linux”] for more detailed description). | |||
Now you can | |||
--- | --- | ||
[1] [https://wiki.somlabs.com/index.php?title=VisionCB-STD https://wiki.somlabs.com/index.php?title=VisionCB-STD] | [1] [https://wiki.somlabs.com/index.php?title=VisionCB-STD https://wiki.somlabs.com/index.php?title=VisionCB-STD] | ||
Latest revision as of 20:04, 17 October 2018
VisionSOM-6ULL - USB recovery mode
VisionSOM – boot modes

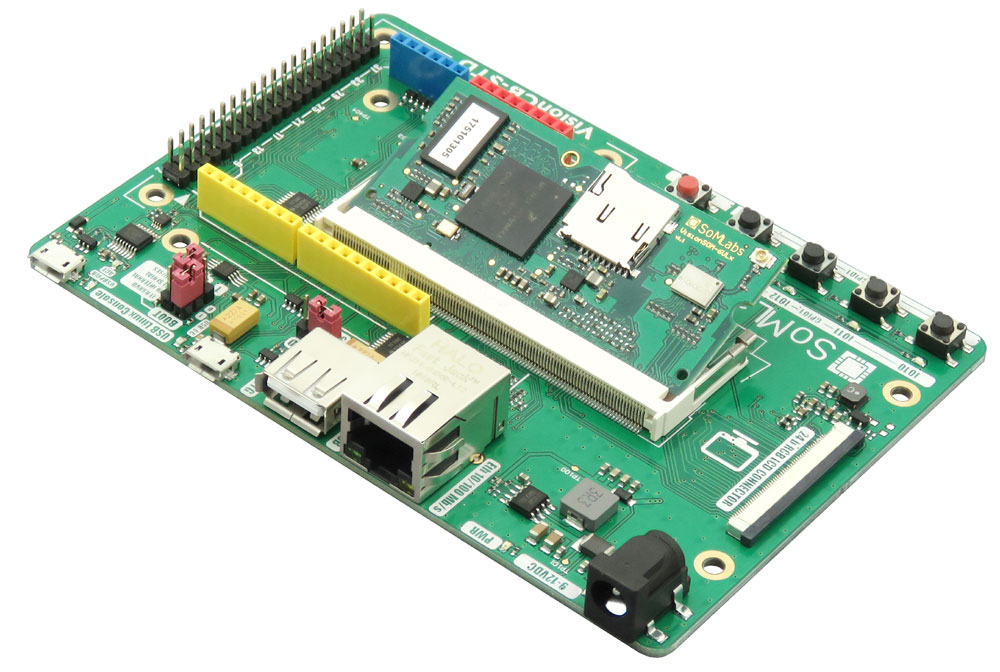
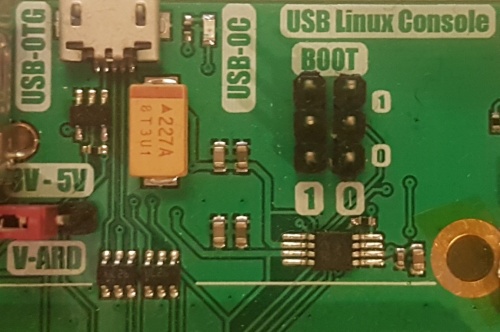
The carrier board VisionCB-STD v.2.0 or later is equipped with additional boot selector (Figure 1) which allows to override the normal boot flow and force a boot to the USB recovery mode.

VisionSOM-6ULL has four boot modes (one is reserved for NXP use). The boot mode is selected by sampling the BOOT_MODE0 and BOOT_MODE1 inputs. The available boot modes are: Boot From Fuses, serial boot via USB (Serial Downloader) and Internal Boot:
| BOOT_MODE[1:0] | Boot Type |
| 00 | Boot From Fuses |
| 01 | Serial Downloader |
| 10 | Internal Boot |
| 11 | Reserved |
Internal Boot
In this mode, the processor continues to execute the boot code from the internal boot ROM. The boot code performs the hardware initialization, loads the program image from the chosen boot device and jumps to an address derived from the program image.
Boot From Fuses
This mode is similar to the Internal Boot mode with one difference. In this mode, the GPIO boot override pins are ignored (please check i.MX 6ULL Applications Processor Reference Manual [2] for more info).
Serial Downloader
The Serial Downloader provides a means to download a program image to the chip over the USB and UART serial connection. In this mode, device continuously polls for the USB and UART connection. The communication is done by Serial Download Protocol. In Serial Downloader mode, the VisionSOM-6ULL module acts as a USB client and fetches the bootloader from a host computer via USB.
Because Serial Downloader mode allows to setup communication with a VisionSOM-6ULL module even without a working bootloader it can be used to recover your device when bootloader has been erased from the storage media (or written with an invalid/corrupted image) and also in cases when the board is new (a board from production with no u-boot yet) or when you are developing u-boot. The Serial Downloader mode is often called "Recovery Mode".
VisionSOM-6ULL – recovery mode
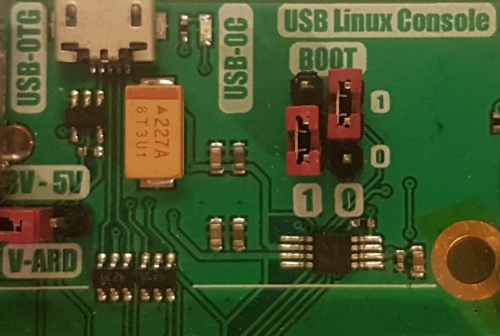
To download new image, the board must be put into recovery mode. Before you power up the board, set the boot jumpers in Serial Downloader mode as shown in Figure 2 - right jumper in the up position and left jumper in down position.

In the next step, connect the USB cable to the USB-OTG connector on the VisionCB-STD carrier board and to your host computer. Make also sure that USB serial cable is connected between board (Linux Console connector) and your PC. Now, power up the board and open a serial terminal at 115200 8N1. If all steps mentioned above are correct, your host PC should detect new HID compliant device. For Linux host systems you can easily check it with lsusb command:
[lskalski@archlinux]$ lsusb
...
Bus 004 Device 001: ID 1d6b:0003 Linux Foundation 3.0 root hub
Bus 003 Device 005: ID 056d:4026 EIZO Corp.
Bus 003 Device 008: ID 15a2:0080 Freescale Semiconductor, Inc.
Bus 003 Device 001: ID 1d6b:0002 Linux Foundation 2.0 root hub
...
To upload new bootloader through USB and Serial Download Protocol, users need to install additional software - MFGTool (official, well-documented tool provided by NXP, but available only for Windows OS) or imx-usb-loader (unofficial, cross-platform tool available for Linux, Windows and macOS systems). In this tutorial we will focus on imx-usb-loader tool.
Compiled version of imx-usb-loader sources provide two binaries: imx_usb and imx_uart for the two supported connections. To run imx_usb, you will need to have libusb installed on your machine. To compile it, you will need also the libusb headers. Linux users can easily install libusb headers by grabbing the libusb-1.0-0-dev package:
[lskalski@archlinux]$ sudo apt-get install libusb-1.0-0-dev
In the next step, clone imx-usb-loader project sources from GitHub [3]:
[lskalski@archlinux]$ git clone git://github.com/boundarydevices/imx_usb_loader
Cloning into 'imx_usb_loader'...
remote: Counting objects: 877, done.
remote: Compressing objects: 100% (12/12), done.
remote: Total 877 (delta 7), reused 12 (delta 5), pack-reused 860
Receiving objects: 100% (877/877), 334.61 KiB | 600.00 KiB/s, done.
Resolving deltas: 100% (550/550), done.
and compile it using make:
[lskalski@archlinux]$ cd imx_usb_loader/
[lskalski@archlinux]$ make
cc -c imx_usb.c -o imx_usb.o -pipe -ggdb `pkg-config --cflags libusb-1.0`-Wstrict-prototypes
cc -c imx_sdp.c -o imx_sdp.o -pipe -ggdb -Wall -Wstrict-prototypes
cc -c imx_sdp_simulation.c -o imx_sdp_simulation.o -pipe -ggdb -Wall -Wstrict-prototypes
cc -c imx_loader_config.c -o imx_loader_config.o -pipe -ggdb -Wall -Wstrict-prototypes
cc -o imx_usb imx_usb.o imx_sdp.o imx_sdp_simulation.o imx_loader_config.o  `pkg-config --libs libusb-1.0`
cc -c imx_uart.c -o imx_uart.o -pipe -ggdb -Wall -Wstrict-prototypes
cc -o imx_uart imx_uart.o imx_sdp.o imx_loader_config.o
Windows users can build imx-usb-loader tool using Visual Studio (subdirectory msvc/ contains the project files for Visual Studio 2015) or MinGW (which allows to use the GNU toolchain to compile a native Microsoft Windows application). In both cases, please make sure that you have a compiled copy of libusb available.
By default, imx-usb-loader simply loads a named file into RAM and executes it. On the host machine - as root - run the imx_usb tool with the binary u-boot file (you can use u-boot.imx binary file from Buildroot image [4]) as parameter:
[root@archlinux imx_usb_loader]# ./imx_usb uboot.imx
If everything goes as planned (using USB your device should be detected automatically using the USB VID/PID), the serial terminal shows the device starting u-boot (output on the serial console), for example:
U-Boot 2016.03 (Feb 06 2018 - 00:58:21 +0100)

CPU:   Freescale i.MX6ULL rev1.0 69 MHz (running at 396 MHz)
CPU:   Industrial temperature grade (-40C to 105C) at 40C
Reset cause: POR
Board: SomLabs VisionSOM 6ULL
DRAM:  512 MiB
MMC:   FSL_SDHC: 0
...
Now you can unbrick your device by uploading new bootloader/image (using for example TFTP server – please visit “How to write image to VisionSOM-6ULL eMMC on Windows and Linux” for more detailed description).
---
[1] https://wiki.somlabs.com/index.php?title=VisionCB-STD
[2] https://www.nxp.com/docs/en/reference-manual/IMX6ULLRM.pdf
[3] https://github.com/boundarydevices/imx_usb_loader
[4] https://wiki.somlabs.com/index.php/VisionSOM-6ULL_Buildroot_Developer_Guide