Writing VisionSOM-6ULL system image to eMMC memory: Difference between revisions
From SomLabs Wiki
Created page with "{{PageHeader|Writing system image to eMMC memory}} == Prerequisites == * PC with Linux Ubuntu 16.04 or newer or Microsoft Windows 10 64-bit OS * A complete package with NXP U..." |
No edit summary |
||
| (2 intermediate revisions by the same user not shown) | |||
| Line 2: | Line 2: | ||
== Prerequisites == | == Prerequisites == | ||
* A complete package with NXP UUU application - [http://ftp.somlabs.com/VisionSOM-6ULL/uuu-visionsom-6ull.zip uuu-visionsom-6ull.zip] | |||
* A complete package with NXP UUU application - [http://ftp.somlabs.com/ | * Built and extracted system image file called image.wic (from Yocto build tmp/deploy/images/visioncb-6ull-std/imx-image-multimedia-visioncb-6ull-std.wic.bz2) | ||
* | * Built bootloader binary u-boot.imx (from Yocto build tmp/deploy/images/visioncb-6ull-std/u-boot.imx or prebuilt binary for SoMLabs Debian [http://ftp.somlabs.com/VisionSOM-6ULL/SoMLabs-VisionSOM-6ULL-Debian-2020-08-u-boot.imx SoMLabs-VisionSOM-6ULL-Debian-2020-08-u-boot.imx]) | ||
== Information == | == Information == | ||
The [http://ftp.somlabs.com/VisionSOM-6ULL/uuu-visionsom-6ull.zip uuu-visionsom-6ull.zip] archive contains the compiled NXP uuu binary for Linux, the commands script and the bootloader supporting fastboot command. The script requires the image.wic and u-boot.imx files to be in the same directory. | |||
== Preparing == | == Preparing == | ||
| Line 46: | Line 42: | ||
[[File:VisionCB-6ULL-STD-2-0-uuu-connection.jpg|600px|center]] | [[File:VisionCB-6ULL-STD-2-0-uuu-connection.jpg|600px|center]] | ||
== Programming VisionSOM eMMC memory | == Programming VisionSOM eMMC memory == | ||
Flasher does not assume any specific partitions layout. It simply takes raw image | Flasher does not assume any specific partitions layout. It simply takes raw system image and writes it into the storage. | ||
=== Linux host PC === | === Linux host PC === | ||
<pre> | For image programing, use command: | ||
<pre>sudo ./uuu vsom-6ull-cmds</pre> | |||
=== Windows host PC === | |||
For image programing, use command: | For image programing, use command: | ||
<pre> | <pre>uuu.exe vsom-6ull-cmds</pre> | ||
=== Programming progress === | |||
At the console, a progress bar will appear: | At the console, a progress bar will appear: | ||
| Line 61: | Line 63: | ||
[[File:VCB_UUU_Linux_flashing_done.png|center|850px]] | [[File:VCB_UUU_Linux_flashing_done.png|center|850px]] | ||
The serial terminal output will look like this: | |||
<pre>U-Boot 2018.03-00022-g23f402fe9c-dirty (May 27 2019 - 23:52:18 +0200) | <pre>U-Boot 2018.03-00022-g23f402fe9c-dirty (May 27 2019 - 23:52:18 +0200) | ||
Latest revision as of 10:40, 30 June 2021
Writing system image to eMMC memory
Prerequisites
- A complete package with NXP UUU application - uuu-visionsom-6ull.zip
- Built and extracted system image file called image.wic (from Yocto build tmp/deploy/images/visioncb-6ull-std/imx-image-multimedia-visioncb-6ull-std.wic.bz2)
- Built bootloader binary u-boot.imx (from Yocto build tmp/deploy/images/visioncb-6ull-std/u-boot.imx or prebuilt binary for SoMLabs Debian SoMLabs-VisionSOM-6ULL-Debian-2020-08-u-boot.imx)
Information
The uuu-visionsom-6ull.zip archive contains the compiled NXP uuu binary for Linux, the commands script and the bootloader supporting fastboot command. The script requires the image.wic and u-boot.imx files to be in the same directory.
Preparing
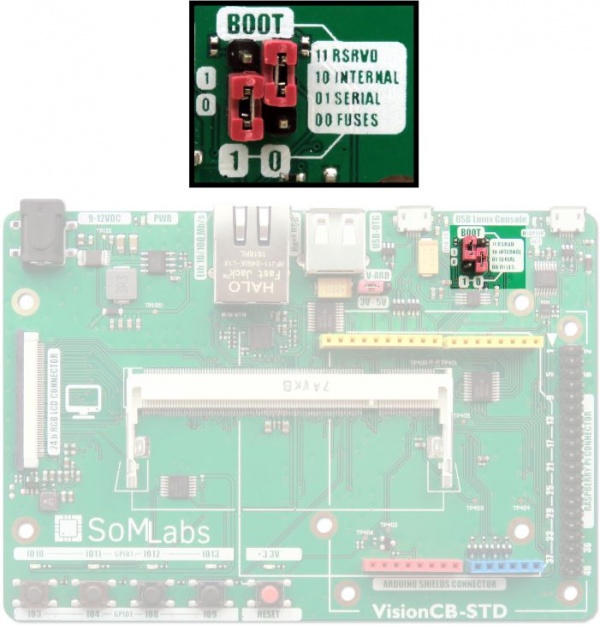
For programming a memory of VisionSOM-6ULL, switch boot selector to mode: SERIAL.
| BOOTx | Boot Mode | |
|---|---|---|
| BOOT1 | BOOT0 | |
| 1 | 1 | Reserved |
| 1 | 0 | Internal |
| 0 | 1 | Serial |
| 0 | 0 | Fuses |

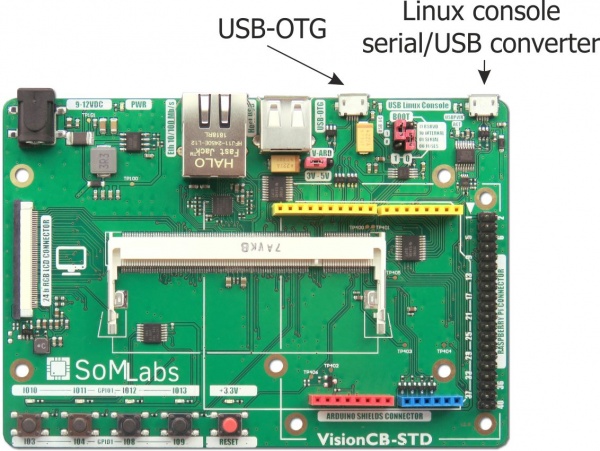
Connect the VisionCB-6ULL-STD board to the host PC using microUSB cable connected to the USB-OTG connector. To observe progress/error reports during programming, please use serial console. If you are using standard VisionSOM carrier board (VisionCB-6ULL-STD), this can be done by using build in serial/usb converter.

Programming VisionSOM eMMC memory
Flasher does not assume any specific partitions layout. It simply takes raw system image and writes it into the storage.
Linux host PC
For image programing, use command:
sudo ./uuu vsom-6ull-cmds
Windows host PC
For image programing, use command:
uuu.exe vsom-6ull-cmds
Programming progress
At the console, a progress bar will appear:

If the process ends with success, the following information will be shown on the console:

The serial terminal output will look like this:
U-Boot 2018.03-00022-g23f402fe9c-dirty (May 27 2019 - 23:52:18 +0200)

CPU:   Freescale i.MX6ULL rev1.0 792 MHz (running at 396 MHz)
CPU:   Industrial temperature grade (-40C to 105C) at 50C
Reset cause: POR
Model: SoMLabs VisionSOM-6ULL
Board: SomLabs VisionSOM-6ULL
DRAM:  512 MiB
board_fix_fdt(): boot device: 7, fdt@8789ed8c
fdt_enable_by_ofname(): enabling node [/soc/aips-bus@02100000/qspi@021e0000] @00                                                                                                                                00641C...result: 0
fdt_enable_by_ofname(): enabling node [/soc/aips-bus@02100000/usdhc@02194000] @0                                                                                                                                0005950...result: 0
board_fix_fdt(): configuring USDHC2 for SD mode
board_fix_fdt(): offset: 00005950, status 0
NAND:  MXS NAND: clock is disabled!
0 MiB
MMC:   FSL_SDHC: 0
No panel detected: default to SL-TFT7-TP
Display: SL-TFT7-TP (800x480)
Video: 800x480x24
Error (-2): cannot determine file size
In:    serial
Out:   serial
Err:   serial
board_late_init()
flash target is MMC:0
Fastboot: Normal
Boot from USB for uuu
Hit any key to stop autoboot:  0
switch to partitions #0, OK
mmc0 is current device
Starting download of 16776232 bytes
..........................................................................
.....................................................
downloading of 16776232 bytes finished
writing to partition 'all'
sparse flash target is mmc:0
writing to partition 'all' for sparse, buffer size 16776232
Flashing sparse image at offset 0
Flashing Sparse Image
........ wrote 16776192 bytes to 'all'
Starting download of 16776244 bytes
..........................................................................
.....................................................
downloading of 16776244 bytes finished
writing to partition 'all'
sparse flash target is mmc:0
writing to partition 'all' for sparse, buffer size 16776244
Flashing sparse image at offset 0
Flashing Sparse Image
........ wrote 16776192 bytes to 'all'


(...)


downloading of 16776244 bytes finished
writing to partition 'all'
sparse flash target is mmc:0
writing to partition 'all' for sparse, buffer size 16776244
Flashing sparse image at offset 0
Flashing Sparse Image
........ wrote 16776192 bytes to 'all'
Starting download of 8396852 bytes
................................................................
downloading of 8396852 bytes finished
writing to partition 'all'
sparse flash target is mmc:0
writing to partition 'all' for sparse, buffer size 8396852
Flashing sparse image at offset 0
Flashing Sparse Image
........ wrote 8396800 bytes to 'all'
resetting ...
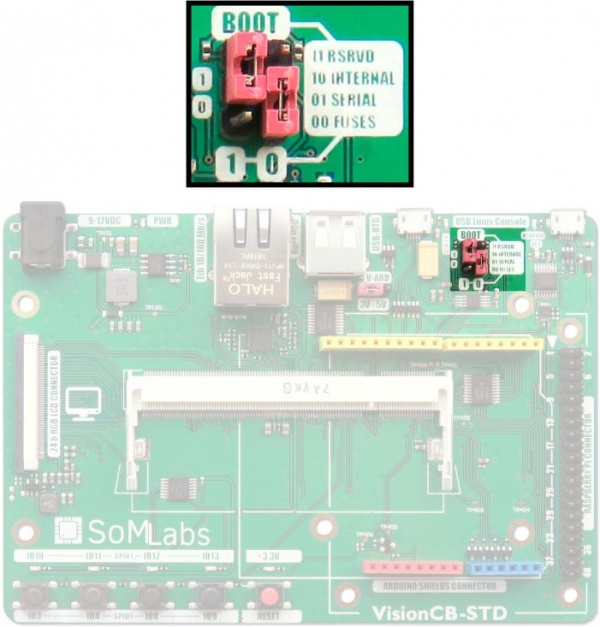
The SoM will not boot due to present boot selector setup. Revert the boot selector back to: INTERNAL and press RESET. The board should start booting.
