Writing system image to SD card: Difference between revisions
From SomLabs Wiki
Created page with "{{PageHeader|Writing system image to SD card}} __toc__ = Linux = == Prerequisites == * PC with Linux 16.04 (other versions and distributions may require some additional opera..." |
No edit summary |
||
| (One intermediate revision by the same user not shown) | |||
| Line 1: | Line 1: | ||
{{PageHeader|Writing system image to SD card}} __toc__ | {{PageHeader|Writing system image to SD card}} __toc__ | ||
= Linux = | = Linux host PC = | ||
== Prerequisites == | == Prerequisites == | ||
* PC with Linux 16.04 (other versions and distributions may require some additional operations) and SD card reader (optionally you may need micro-SD to full-size SD card adapter for your computer SD reader) | * PC with Linux 16.04 (other versions and distributions may require some additional operations) and SD card reader (optionally you may need micro-SD to full-size SD card adapter for your computer SD reader) | ||
| Line 38: | Line 38: | ||
<pre>sudo dd if=system_image.img of=/dev/sdX bs=64k</pre> | <pre>sudo dd if=system_image.img of=/dev/sdX bs=64k</pre> | ||
When ''dd'' command finishes then your SD card is ready, insert it into | When ''dd'' command finishes then your SD card is ready, insert it into the module's socket and power the system. | ||
= Windows = | = Windows host PC = | ||
== Prerequisites == | == Prerequisites == | ||
| Line 63: | Line 63: | ||
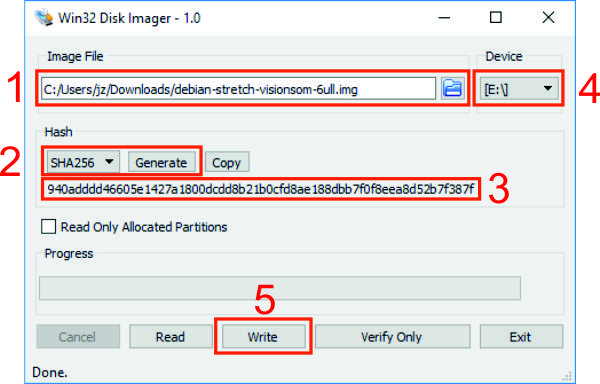
[[File:Visionsom-6ull-win32-di.jpg|center|Writing system image with Win32 Disk Imager]] | [[File:Visionsom-6ull-win32-di.jpg|center|Writing system image with Win32 Disk Imager]] | ||
Your card is ready, insert it into | Your card is ready, insert it into the micro-SD socket and power the system. | ||
Latest revision as of 08:08, 1 July 2022
Writing system image to SD card
Linux host PC
Prerequisites
- PC with Linux 16.04 (other versions and distributions may require some additional operations) and SD card reader (optionally you may need micro-SD to full-size SD card adapter for your computer SD reader)
- Micro-SD card
- Extracted system image (*.img file)
Writing image to SD card
Connect your SD card to the PC, while it is connected enter:
sudo parted -l
Model: ATA SAMSUNG HM500JJ (scsi)
Disk /dev/sda: 500GB
Sector size (logical/physical): 512B/512B
Partition Table: msdos
Disk Flags:

Number  Start   End    Size    Type      File system     Flags
 1      1049kB  480GB  480GB   primary   ext4            boot
 2      480GB   500GB  20.1GB  extended
 5      480GB   500GB  20.1GB  logical   linux-swap(v1)


Model: Generic- Multi-Card (scsi)
Disk /dev/sdc: 7745MB
Sector size (logical/physical): 512B/512B
Partition Table: msdos
Disk Flags:

Number  Start   End     Size    Type     File system  Flags
 1      8389kB  4048MB  4039MB  primary  ext4
You can see that SD card is identified as /dev/sdc, now you can write the image to your SD card. IMPORTANT! Double check if you properly identified you SD card in Linux file system, if you write the image to other device your data will be lost! Also double check dd command parameters!
NOTE! Replace /dev/sdX with your device name if following command.
sudo dd if=system_image.img of=/dev/sdX bs=64k
When dd command finishes then your SD card is ready, insert it into the module's socket and power the system.
Windows host PC
Prerequisites
- PC with Windows 7 or newer and SD card reader (optionally you may need micro-SD to full-size SD card adapter for your computer SD reader)
- Micro-SD card
- Win32 Disk Imager installer - available for download here
- Extracted system image (*.img file)
Writing image to SD card
Install Win32 Disk Imager (accept all default settings) and insert your SD card to computer card reader. You need to know which drive represents your SD card, you can for example open Files Explorer (Win+E) and check which drive shows up when you insert your card.
IMPORTANT! Double check which drive is your card, if you select wrong drive letter in Win32 Disk Imager then you will erase data on one of your computer drives!
Now you can start Win32 Disk Imager and:
- Select unpacked image file
- In Hash section select SHA256 algorithm and click Generate
- Compare generated hash with the hash of your image file (if available), if hashes are identical then continue, if not - try to download the archive once again
- Select your card in Device section
- Click Write and wait until Win32 Disk Imager finishes

Your card is ready, insert it into the micro-SD socket and power the system.