Installing OpenSTLinux on VisionSOM-STM32MP1 with SD card: Difference between revisions
From SomLabs Wiki
Created page with "{{PageHeader|Installing OpenSTLinux on VisionSOM-STM32MP1 with SD card}} The built system image file can be written to the SD card using the following command: <pre> sudo dd..." |
No edit summary |
||
| Line 6: | Line 6: | ||
sudo dd if=<image .raw file> of=/dev/sdX bs=1M | sudo dd if=<image .raw file> of=/dev/sdX bs=1M | ||
</pre> | </pre> | ||
The ''/dev/sdX'' shall be changed according to the SD card device name. | |||
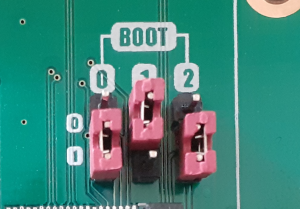
In order to run the images from SD card the main board jumpers shall be set as follows (BOOT[0:2] = 101): | In order to run the images from SD card the main board jumpers shall be set as follows (BOOT[0:2] = 101): | ||
[[File:Stm32mp1_sd_boot_jumpers.png|center|300px]] | [[File:Stm32mp1_sd_boot_jumpers.png|center|300px]] | ||
Latest revision as of 15:52, 20 November 2020
Installing OpenSTLinux on VisionSOM-STM32MP1 with SD card
The built system image file can be written to the SD card using the following command:
sudo dd if=<image .raw file> of=/dev/sdX bs=1M
The /dev/sdX shall be changed according to the SD card device name.
In order to run the images from SD card the main board jumpers shall be set as follows (BOOT[0:2] = 101):
