Writing VisionSOM-6ULL system image to eMMC memory: Difference between revisions
From SomLabs Wiki
m KrzysztofChojnowski moved page Writing system image to eMMC memory to Writing VisionSOM-6ULL system image to eMMC memory |
No edit summary |
||
| Line 2: | Line 2: | ||
== Prerequisites == | == Prerequisites == | ||
* PC with Linux Ubuntu | * PC with Linux Ubuntu 18.04 | ||
* A complete package with NXP UUU application - [ | * A complete package with NXP UUU application - [[Media:Uuu.zip|uuu.zip]] | ||
* Built and extracted system image file called image.wic (from Yocto build tmp/deploy/images/visioncb-6ull-std/imx-image-multimedia-visioncb-6ull-std.wic.bz2) | |||
* Built bootloader binary u-boot.imx (from Yocto build tmp/deploy/images/visioncb-6ull-std/u-boot.imx) | |||
== Information == | == Information == | ||
The [[Media:Uuu.zip|uuu.zip]] archive contains the compiled NXP uuu binary for Linux, the commands script and the bootloader supporting fastboot command. The script required the image.wic and u-boot.imx files to be in the same directory. | |||
== Preparing == | == Preparing == | ||
| Line 48: | Line 45: | ||
== Programming VisionSOM eMMC memory/uSD card == | == Programming VisionSOM eMMC memory/uSD card == | ||
Flasher does not assume any specific partitions layout. It simply takes raw image of eMMC/SD card and writes it into the storage. | Flasher does not assume any specific partitions layout. It simply takes raw image of eMMC/SD card and writes it into the storage. | ||
=== Linux host PC === | === Linux host PC === | ||
For image programing, use command: | For image programing, use command: | ||
<pre>sudo ./uuu - | <pre>sudo ./uuu -v vsom-6ull-cmds</pre> | ||
At the console, a progress bar will appear: | At the console, a progress bar will appear: | ||
| Line 61: | Line 57: | ||
[[File:VCB_UUU_Linux_flashing_done.png|center|850px]] | [[File:VCB_UUU_Linux_flashing_done.png|center|850px]] | ||
The serial terminal output will look like this: | |||
<pre>U-Boot 2018.03-00022-g23f402fe9c-dirty (May 27 2019 - 23:52:18 +0200) | <pre>U-Boot 2018.03-00022-g23f402fe9c-dirty (May 27 2019 - 23:52:18 +0200) | ||
Revision as of 15:26, 7 April 2021
Writing system image to eMMC memory
Prerequisites
- PC with Linux Ubuntu 18.04
- A complete package with NXP UUU application - uuu.zip
- Built and extracted system image file called image.wic (from Yocto build tmp/deploy/images/visioncb-6ull-std/imx-image-multimedia-visioncb-6ull-std.wic.bz2)
- Built bootloader binary u-boot.imx (from Yocto build tmp/deploy/images/visioncb-6ull-std/u-boot.imx)
Information
The uuu.zip archive contains the compiled NXP uuu binary for Linux, the commands script and the bootloader supporting fastboot command. The script required the image.wic and u-boot.imx files to be in the same directory.
Preparing
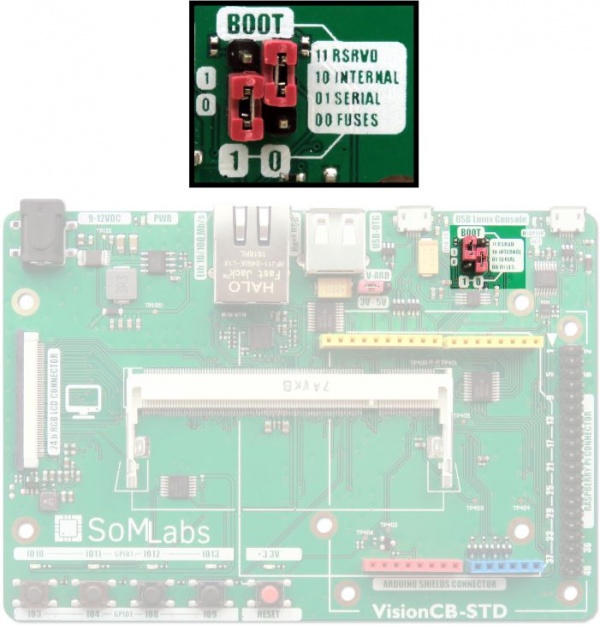
For programming a memory of VisionSOM-6ULL, switch boot selector to mode: SERIAL.
| BOOTx | Boot Mode | |
|---|---|---|
| BOOT1 | BOOT0 | |
| 1 | 1 | Reserved |
| 1 | 0 | Internal |
| 0 | 1 | Serial |
| 0 | 0 | Fuses |

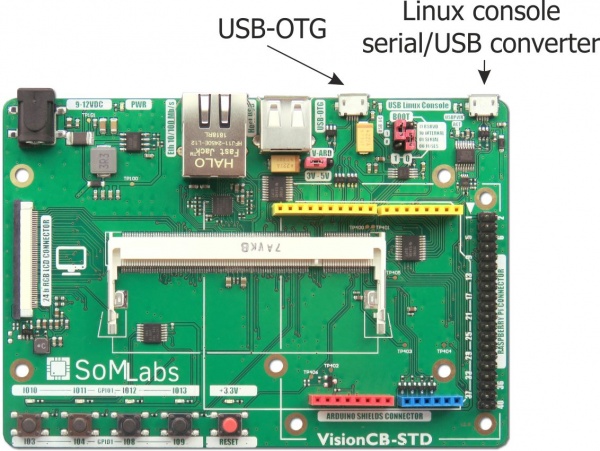
Connect the VisionCB-6ULL-STD board to the host PC using microUSB cable connected to the USB-OTG connector. To observe progress/error reports during programming, please use serial console. If you are using standard VisionSOM carrier board (VisionCB-6ULL-STD), this can be done by using build in serial/usb converter.

Programming VisionSOM eMMC memory/uSD card
Flasher does not assume any specific partitions layout. It simply takes raw image of eMMC/SD card and writes it into the storage.
Linux host PC
For image programing, use command:
sudo ./uuu -v vsom-6ull-cmds
At the console, a progress bar will appear:

If the process ends with success, the following information will be shown on the console:

The serial terminal output will look like this:
U-Boot 2018.03-00022-g23f402fe9c-dirty (May 27 2019 - 23:52:18 +0200)

CPU:   Freescale i.MX6ULL rev1.0 792 MHz (running at 396 MHz)
CPU:   Industrial temperature grade (-40C to 105C) at 50C
Reset cause: POR
Model: SoMLabs VisionSOM-6ULL
Board: SomLabs VisionSOM-6ULL
DRAM:  512 MiB
board_fix_fdt(): boot device: 7, fdt@8789ed8c
fdt_enable_by_ofname(): enabling node [/soc/aips-bus@02100000/qspi@021e0000] @00                                                                                                                                00641C...result: 0
fdt_enable_by_ofname(): enabling node [/soc/aips-bus@02100000/usdhc@02194000] @0                                                                                                                                0005950...result: 0
board_fix_fdt(): configuring USDHC2 for SD mode
board_fix_fdt(): offset: 00005950, status 0
NAND:  MXS NAND: clock is disabled!
0 MiB
MMC:   FSL_SDHC: 0
No panel detected: default to SL-TFT7-TP
Display: SL-TFT7-TP (800x480)
Video: 800x480x24
Error (-2): cannot determine file size
In:    serial
Out:   serial
Err:   serial
board_late_init()
flash target is MMC:0
Fastboot: Normal
Boot from USB for uuu
Hit any key to stop autoboot:  0
switch to partitions #0, OK
mmc0 is current device
Starting download of 16776232 bytes
..........................................................................
.....................................................
downloading of 16776232 bytes finished
writing to partition 'all'
sparse flash target is mmc:0
writing to partition 'all' for sparse, buffer size 16776232
Flashing sparse image at offset 0
Flashing Sparse Image
........ wrote 16776192 bytes to 'all'
Starting download of 16776244 bytes
..........................................................................
.....................................................
downloading of 16776244 bytes finished
writing to partition 'all'
sparse flash target is mmc:0
writing to partition 'all' for sparse, buffer size 16776244
Flashing sparse image at offset 0
Flashing Sparse Image
........ wrote 16776192 bytes to 'all'


(...)


downloading of 16776244 bytes finished
writing to partition 'all'
sparse flash target is mmc:0
writing to partition 'all' for sparse, buffer size 16776244
Flashing sparse image at offset 0
Flashing Sparse Image
........ wrote 16776192 bytes to 'all'
Starting download of 8396852 bytes
................................................................
downloading of 8396852 bytes finished
writing to partition 'all'
sparse flash target is mmc:0
writing to partition 'all' for sparse, buffer size 8396852
Flashing sparse image at offset 0
Flashing Sparse Image
........ wrote 8396800 bytes to 'all'
resetting ...
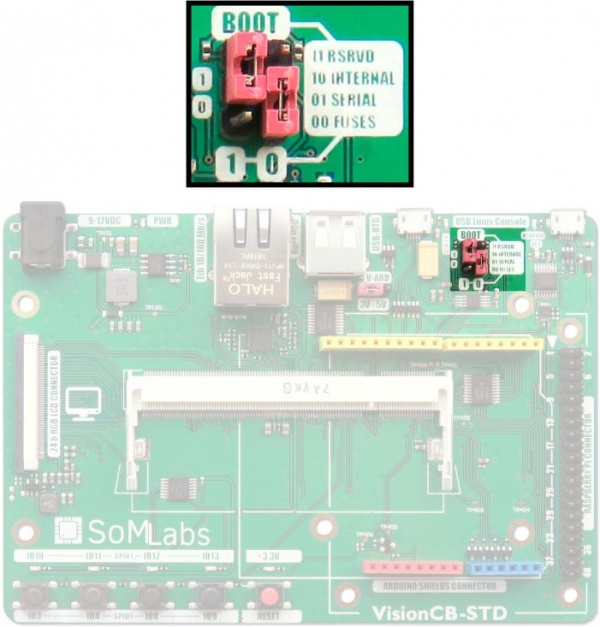
The SoM will not boot due to present boot selector setup. Revert the boot selector back to: INTERNAL and press RESET. The board should start booting.
