How to use a splash screen with VisionSOM-6ULL
From SomLabs Wiki
How to use a splash screen with VisionSOM-6ULL
Prerequisites
- PC with Microsoft Windows 10 64-bit OS or Linux Ubuntu 16.04+ (for flashing to NAND only)
- A complete package with NXP UUU application (for flashing to NAND only)
- splash.bmp - splash screen bitmap file (from the complete package above or generated by yourself)
Information
- SOMLABS solution is based on NXP UUU tool, with some extensions added on top of it to easly handle SOMLABS boards.
- You can use different file names than default (vsom-6ull-fb.bin, rootfs.ubi) - these names are just examples.
- Please note also, that file can be located in any directory - you need to specify complete file path then.
- If you are using VisionSOM module with i.MX6UL processor, please change in commands given below '6ull' to '6ul'
- A file named "vsom-6ull-fb.bin" (included in the above package) is a u-boot file, which is used only while flashing eMMC/SD card with UUU application. The user u-boot located inside sdcard.img remains unchanged.
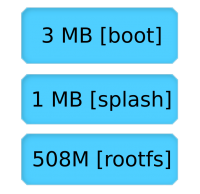
- Default NAND paritions layout for 4M boot variant (remaining NAND area is used for root file system by default):

Preparing
For programming a memory of VisionSOM-6ULL, switch boot selector to mode: SERIAL.
| BOOTx | Boot Mode | |
|---|---|---|
| BOOT1 | BOOT0 | |
| 1 | 1 | Reserved |
| 1 | 0 | Internal |
| 0 | 1 | Serial |
| 0 | 0 | Fuses |
Connect the VisionCB-STD board to the host PC using microUSB cable connected to the USB-OTG connector. To observe progress/error reports during programming, please use serial console. If you are using standard VisionSOM carrier board (VisionCB-6ULL-STD), this can be done by using build in serial/usb converter.
Splash screen bitmap file
A maximum size of splash image file is 800x480px (equal to SL-TFT7-TP-800-480-P display resolution), bpp shall be 24-bit or 8-bit with pallete. Image shall be stored as .bmp file. Please ensure that file size must be smaller than 1MB.
Flashing splash screen to eMMC/SD card
There is no need to perform any additional step to program custom splash image - for applying a splash screen, simply put prepared 'splash.bmp' file into '/boot' directory of the root file system. Please ensure if u-boot on your SD card image supports splash screen displaying.
Flashing splash screen to NAND (from Windows host machine)
Run command:
uuu.exe -b vsom_6ull_nand_splash splash.bmp
Flashing splash screen to NAND (from Linux host machine)
Run command:
sudo ./uuu -b vsom_6ull_nand_splash splash.bmp
Note
Be aware if any of erase blocks in 'splash' partiton are bad, then max. size of splash screen will be smaller. To meet size limit, it is possible to compress bitmap file with gzip and write compressed file to NAND.