Customizing the Linux kernel
From SomLabs Wiki
Customizing the Linux kernel
Contents
This tutorial shows how to download, patch, modify and update the Linux kernel in the existing system on VisionSOM module. It was tested on the PC with Ubuntu 18.04 host system.
Downloading toolchain
For the kernel compilation we need an appropriate compiler that will generate kernel image for the ARM architecture. We will use the ready toolchain from Linaro. It can be download from the Linaro website using wget command:
wget https://releases.linaro.org/components/toolchain/binaries/7.4-2019.02/arm-linux-gnueabihf/gcc-linaro-7.4.1-2019.02-x86_64_arm-linux-gnueabihf.tar.xz
and extracted using tar:
tar -xf gcc-linaro-7.4.1-2019.02-x86_64_arm-linux-gnueabihf.tar.xz
Now the toolchain is ready to use.
Downloading the Linux kernel
The iMX6ULL processor is fully supported by the Linux kernel version maintained by the NXP company. We will use the kernel released under version 5.4.24. The sources of the NXP kernel patched by SoMLabs can be downloaded from the Github repositories using git command:
git clone https://github.com/SoMLabs/somlabs-linux-imx.git linux-imx
The original NXP kernel is available in the repository (branch imx_5.4.24_2.1.0):
https://source.codeaurora.org/external/imx/linux-imx
Customizing the Linux kernel
The kernel configuration tools require two environmental variables describing the chosen architecture and toolchain. We can set them in the current terminal with the following commands:
export ARCH=arm
export CROSS_COMPILE=<LINARO_TOOLCHAIN_PATH>/gcc-linaro-7.4.1-2019.02-x86_64_arm-linux-gnueabihf/bin/arm-linux-gnueabihf-
Now we can create the default configuration from the SoMLabs kernel patch:
make visionsom_6ull_defconfig
This configuration may be used as a base for further customization. Alternatively one of the configuration files provided by NXP may also be used - they can be found in the arch/arm/configs/ directory.
To modify the kernel we can use some graphical tools. The examples are:
- make menuconfig - based on ncurses library
- make nconfig - based on ncurses library
- make xconfig - based on qt library
Each of these tools displays all of the possible configuration options of the kernel.
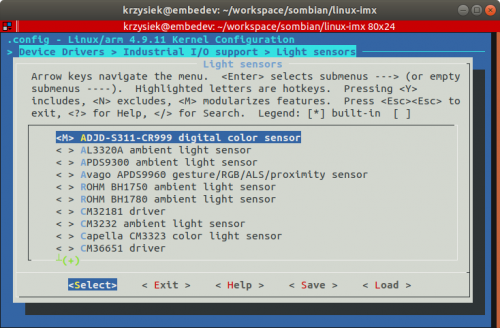
For example, in order to add the support for a luminosity sensor using the menuconfig tool we need to go to Device Drivers > Industrial I/O support > Light sensors section and select one of the supported devices (pressing Y adds the driver to kernel, M configures it as a kernel module, N removes the driver):
After all changes the we need to save them and the selected tool will generate a new configuration file (.config in the kernel source directory).
Building the Linux kernel
When the configuration is ready, the kernel can be built using the command:
make
called from the base kernel directory. It is important to remember also about the ARCH and CROSS_COMPILE variables:
export ARCH=arm
export CROSS_COMPILE=<LINARO_TOOLCHAIN_PATH>/gcc-linaro-7.4.1-2019.02-x86_64_arm-linux-gnueabihf/bin/arm-linux-gnueabihf-
In order to compile the kernel in multi-core environment, the -j option can be added to define the number of cores for the compilation, for example:
make -j6
This command will build the entire kernel, modules and the device tree. it is also possible to build selected parts by choosing one or more targets:
make zImage modules dtbs
- zImage - kernel image
- modules - kernel modules
- dtbs - device tree
The new kernel image is located in the arch/arm/boot/zImage file and the device tree blobs can be found in the arch/arm/boot/dts/ directory. For the VisionCB-STD-6ULL there are four hardware configurations available:
- visioncb-6ull-std-sd.dtb - for SD card module version without wireless modem
- visioncb-6ull-std-sd-btwifi.dtb - for SD card module version with wireless modem
- visioncb-6ull-std-emmc.dtb - for eMMC card module version without wireless modem
- visioncb-6ull-std-sd-btwifi.dtb - for eMMC card module version with wireless modem
Finally the modules can be installed using the following command:
make modules_install INSTALL_MOD_PATH=<MODULES_INSTALL_PATH>
We need to specify the installation path of the modules in place of MODULES_INSTALL_PATH. It can be any local directory - all modules will be collected from the kernel source directory and copied there.
If we need the kernel headers we can collect them in a similar way:
make headers_install INSTALL_HDR_PATH=<HEADERS_INSTALL_PATH>
Installing new Linux kernel
Now, when we have all kernel components we can install the to our VisionSOM system. The original kernel (zImage) and the device tree files (*.dtb) are located in the /boot directory on SD card or eMMC memory, so we can just backup the old versions and replace them. If the /boot directory is empty we need to mount the boot partition using the command:
mount /dev/mmcblk1p1 /boot
The built device tree files should be renamed according to the original ones recognized by u-boot:
- visionsom-6ull.dtb - for SD card module
- visionsom-6ull-emmc.dtb - for eMMC module
The kernel modules needs to be copied to the /lib/modules directory and the headers to /usr/include.


