Difference between revisions of "Writing StarSBC-6ULL system image to eMMC memory"
From SomLabs Wiki
| Line 27: | Line 27: | ||
[[File:Starsbc_6ull_program_emmc_1.jpg|center|300px]] | [[File:Starsbc_6ull_program_emmc_1.jpg|center|300px]] | ||
| − | + | [[File:Starsbc_6ull_program_emmc_2.jpg|center|300px]] | |
| − | |||
The pads need to be shortcuted until the uuu programming process starts. | The pads need to be shortcuted until the uuu programming process starts. | ||
After the process is done the board may be reset to start the programmed image. | After the process is done the board may be reset to start the programmed image. | ||
Revision as of 11:05, 12 December 2022
Writing system image to eMMC memory
Prerequisites
- A complete package with NXP UUU application - uuu-visionsom-6ull.zip
- Built and extracted system image file called image.wic (from Yocto build tmp/deploy/images/starsbc-6ull/somlabs-image-starsbc-6ull.wic.bz2)
- Built bootloader binary u-boot.imx (from Yocto build tmp/deploy/images/starsbc-6ull/u-boot.imx)
Information
The uuu-visionsom-6ull.zip archive contains the compiled NXP uuu binary for Linux, the commands script and the bootloader supporting fastboot command. The script requires the image.wic and u-boot.imx files to be in the same directory.
Programming StartSBC-6ULL eMMC memory
For image programing, use one of the following commands.
On Linux host:
sudo ./uuu vsom-6ull-cmds
On Windows host:
uuu.exe vsom-6ull-cmds
After the uuu tool stops and the following message is displayed:
Wait for Known USB Device Appear...
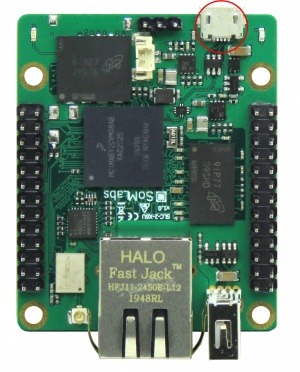
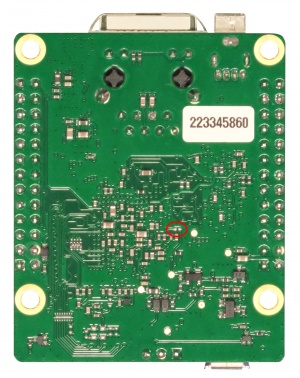
connect the board to the PC using the microUSB port with connected pads on the bottom side of the module.
The pads need to be shortcuted until the uuu programming process starts.
After the process is done the board may be reset to start the programmed image.


