Writing SpaceSOM-8Mplus system image to eMMC memory
From SomLabs Wiki
Writing system image to eMMC memory
This tutorial explains how to write the generated system image to the eMMC memory on the SpaceSOM-8Mplus module. This setup requires also the SpaceCB-8Mplus-ADV carrier board. The image is written using the UUU tool from NXP. It may be obtained from the NXP website or github repository.
Required files
In order to write the system image to the eMMC the following files are required (all of them are generated during Yocto system building):
- the bootloader binary - imx-boot-spacesom-8mplus-cb-sd.bin-flash_evk
- system image - somlabs-image-spacesom-8mplus-cb.wic
Writing image procedure
The following steps are required to install the image in the eMMC memory.
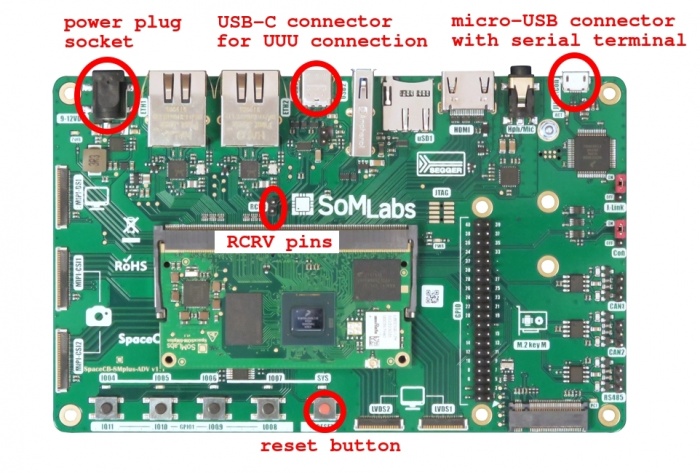
- Connect the USB-C cable to the USB1 connector on the SpaceCB-8Mplus-ADV board
- Optionally connect the micro-USB cable to the JLink/Con connector and open a serial terminal to observe the u-boot logs during programming
- Connect both RCRV pins with a jumper to enable processor serial loader mode after power-up
- Power-on the board
- Run the UUU tool:
Linux:
sudo ./uuu -v -b emmc_all imx-boot-spacesom-8mplus-cb-sd.bin-flash_evk somlabs-image-spacesom-8mplus-cb.wic
Windows:
uuu.exe -v -b emmc_all imx-boot-spacesom-8mplus-cb-sd.bin-flash_evk somlabs-image-spacesom-8mplus-cb.wic
- Wait for the programming to finish
- Remove the jumper from RCRV pins
- Reset the board, the programmed system will boot
