How to write image to VisionSOM-6ULL eMMC on Windows and Linux
From SomLabs Wiki
How to write image to VisionSOM-6ULL eMMC on Windows and Linux

Prerequisites
- Writing image from Linux host
- PC with Ubuntu 16
- VisionSOM module connected to network, access to console is required
- Writing image from Windows host
- PC with Windows 10
- VisionSOM module connected to network, access to console is required
- Open TFTP Server
- Open DHCP Server
- PuTTY terminal
- If your image file is bigger that your SoM module RAM then you will also need Total Commander or any other tool for splitting files
Setup TFTP and DHCP servers on host computer
Linux
Install isc-dhcp-server package:
sudo apt install isc-dhcp-server
Configure DHCP server, to do that edit file /etc/dhcp/dhcpd.conf:
sudo nano /etc/dhcp/dhcpd.conf
Add lines:
subnet <SUBNET_ADDRESS> netmask <NETMASK> {
  range <RANGE_START> <RANGE_END>;
}
Set adresses to fit your network:
- <SUBNET_ADDRESS> is address of your network (most common are 192.168.0.0 and 192.168.1.0)
- <NETMASK> is mask of your network (most common is 255.255.255.0)
- <RANGE_START> and <RANGE_END> are first and last DHCP client adresses, for example 192.168.0.200 192.168.0.220
You also need to set interfaces that DHCP server will listen on, to do that edit /etc/default/isc-dhcp-server file:
nano /etc/default/isc-dhcp-server
Add/modify line with INTERFACES variable:
INTERFACES="<INTERFACES>"
Replace <INTERFACES> with space-separated list of interfaces, to find their names execute:
ip a
The output will look like this:
1: lo: <LOOPBACK,UP,LOWER_UP> mtu 65536 qdisc noqueue state UNKNOWN group default qlen 1000
    link/loopback 00:00:00:00:00:00 brd 00:00:00:00:00:00
    inet 127.0.0.1/8 scope host lo
       valid_lft forever preferred_lft forever
    inet6 ::1/128 scope host
       valid_lft forever preferred_lft forever
2: enp3s0: <NO-CARRIER,BROADCAST,MULTICAST,UP> mtu 1500 qdisc pfifo_fast state DOWN group default qlen 1000
    link/ether 54:ee:75:b0:b0:ad brd ff:ff:ff:ff:ff:ff
3: wlp2s0: <BROADCAST,MULTICAST,UP,LOWER_UP> mtu 1500 qdisc mq state UP group default qlen 1000
    link/ether 58:fb:84:a3:a2:82 brd ff:ff:ff:ff:ff:ff
    inet 192.168.0.123/24 brd 192.168.0.255 scope global wlp2s0
       valid_lft forever preferred_lft forever
    inet6 2a02:a310:813c:d700:d26:a34f:fa29:709d/64 scope global noprefixroute dynamic
       valid_lft 792131sec preferred_lft 187331sec
    inet6 fe80::b7f8:715e:756c:33bb/64 scope link
       valid_lft forever preferred_lft forever
In this case lo, enp3s0 and wlp2s0 are interface names. To listen on enp3s0 and wlp2s0 interfaces enter:
INTERFACES="enp3s0 wlp2s0"
After saving these modifications restart DHCP server:
sudo service isc-dhcp-server restart
To install TFTP server execute:
sudo apt install tftpd-hpa
Root directory of TFTP server is /var/lib/tftpboot, in next steps you will put image file/files in this directory.
Windows
Install Open TFTP Server and Open DHCP Server. After installation go to c:\OpenDHCPServer\ directory (or wherever you installed Open DHCP Server) and open OpenDHCPServer.ini, find first [RANGE_SET] section and modify DHCPRange value to values fitting your network (in this example it is 192.168.0.200-192.168.0.220)
[RANGE_SET]
# This is first and simple DHCP range section example,
# This example may be good enough for simple/home use.
# If you need range filters, look at example below
DHCPRange=192.168.0.200-192.168.0.220
;DHCPRange=192.168.5.1-192.168.5.254
# Following are range specific DHCP options.
# You can copy more options names from [GLOBAL_OPTIONS]
Restart DHCP server:
- Open Control Panel
- Click Administrative Tools
- Double-click Services
- Find Open DHCP Server in the list, right-click it and choose Restart
You may also need to disable firewall for DHCP and TFTP servers.
Open Windows Defender Security Center and click Firewall & network protection.
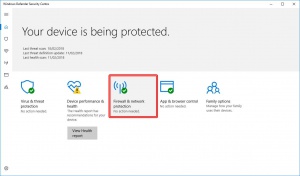
Click Allow an app through the firewall.
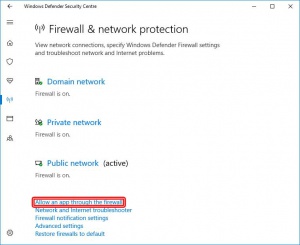
Press Change settings, then click Allow another app... button.
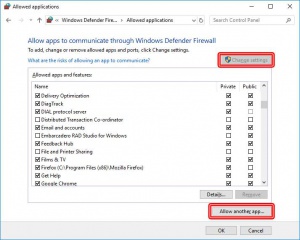
Click Browse... button, select TFTP server executable (default c:\OpenTFTPServer\OpenTFTPServerMT.exe) and confirm, then click Add. Perform the same operation for DHCP server (c:\OpenDHCPServer\OpenDHCPServer.exe).
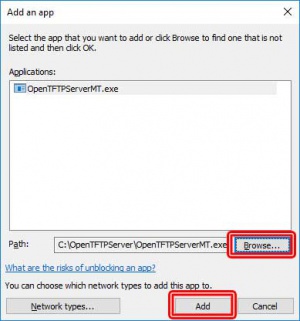
Note! If you have any additional security software you may need to allow incoming connections to DHCP server and TFTP server.
Root directory of TFTP server is c:\OpenTFTPServer\, in next steps you will put image file/files in this directory.
Writing image to eMMC
Writing image smaller than SoM RAM
You need uncompressed image file, place it in TFTP server root directory.
Connect your board to network, power it up and connect to the console. While the board is booting you need to stop autoboot by pressing any key in the console:
U-Boot 2016.03 (Feb 06 2018 - 00:58:21 +0100)

CPU:   Freescale i.MX6ULL rev1.0 69 MHz (running at 396 MHz)
CPU:   Industrial temperature grade (-40C to 105C) at 40C
Reset cause: POR
Board: SomLabs VisionSOM 6ULL
DRAM:  512 MiB
MMC:   FSL_SDHC: 0
*** Warning - bad CRC, using default environment

Display: TFT43AB (480x272)
Video: 480x272x24
In:    serial
Out:   serial
Err:   serial
switch to partitions #0, OK
mmc0(part 0) is current device
Net:   FEC0 [PRIME]
Warning: FEC0 (eth0) using random MAC address - 5e:8f:15:1b:17:5c

Normal Boot
Hit any key to stop autoboot:  0
=>
Now you can enter a command that will download the image and will write it to eMMC memory:
setenv serverip <TFTP_SERVER_IP>; setenv bootfile <IMAGE_FILE_NAME>; dhcp; mmc write $loadaddr 0 <IMAGE_FILE_SIZE>
You must:
- Replace <TFTP_SERVER_IP> with your TFTP server IP
- Replace <IMAGE_FILE_NAME> with name of the image file you placed on your TFTP server
- Replace <IMAGE_FILE_SIZE> with hexadecimal number of 512 byte blocks that the image file consist of. For example:
- Your image file size is 142606336 bytes
- Divide the size by 512, 142606336/512 = 278528
- Convert this number to hexadecimal: 44000
Example:
setenv serverip 192.168.0.111; setenv bootfile sdcard.img; dhcp; mmc write $loadaddr 0 44000
After the command completes reboot your board, your new image should boot now.
Writing image bigger than SoM RAM
You need uncompressed image file, as it is too big to load it at once it must be splitted into smaller files. Note that result files sizes should be multiple of 512.
Splitting file on Linux
Get your image file, for example Debian image, and decompress it:
cd ~
wget http://ftp.somlabs.com/debian-stretch-visionsom-6ull.img.xz
unxz
Now we will split the file into smaller parts:
sudo split --bytes=450M debian-stretch-visionsom-6ull.img part_
In this command:
- --bytes=450M means that parts will have maximum size of 450MB (you may need smaller parts if your SoM has smaller RAM
- debian-stretch-visionsom-6ull.img is name of the file to split
- part_ is a prefix that will be used to create names of output files. In this case we will get part_aa and part_ab output files
To get exact file sizes run (we will need them in the next step):
ls part_* -l
You will get this output:
-rw-r--r-- 1 root root 471859200 lut 11 13:11 part_aa
-rw-r--r-- 1 root root 361758720 lut 11 13:12 part_ab
Copy this files to your TFPT root:
sudo cp ~/part_* /var/lib/tftpboot/
Splitting file on Windows
Get your image file, for example Debian image, and decompress it. Run Total Commander, in the left panel open c:\OpenTFTPServer\ directory, in the right panel open the directory with extracted image file. Select image file with right-click (file name should become red), select Files>Split File in the menu, in Bytes per file field enter maximal file size, in this example SoM with 512 MB RAM is used, so we will use 450MB files, that is 471859200 bytes, so enter 471859200 and click ok.
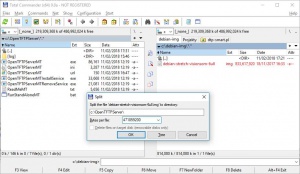
In the left panel you should get debian-stretch-visionsom-6ull.001 and debian-stretch-visionsom-6ull.002 files.
Writing splitted image files
Connect your board to network, power it up and connect to the console. While the board is booting you need to stop autoboot by pressing any key in the console:
U-Boot 2016.03 (Feb 06 2018 - 00:58:21 +0100)

CPU:   Freescale i.MX6ULL rev1.0 69 MHz (running at 396 MHz)
CPU:   Industrial temperature grade (-40C to 105C) at 40C
Reset cause: POR
Board: SomLabs VisionSOM 6ULL
DRAM:  512 MiB
MMC:   FSL_SDHC: 0
*** Warning - bad CRC, using default environment

Display: TFT43AB (480x272)
Video: 480x272x24
In:    serial
Out:   serial
Err:   serial
switch to partitions #0, OK
mmc0(part 0) is current device
Net:   FEC0 [PRIME]
Warning: FEC0 (eth0) using random MAC address - 5e:8f:15:1b:17:5c

Normal Boot
Hit any key to stop autoboot:  0
=>
Now we can write image files, but first it is necessary to calculate part_* (on Linux) or debian-stretch-visionsom-6ull.* (on Windows) files sizes in 512B blocks as hexadecimals:
- part_aa/debian-stretch-visionsom-6ull.001 - size 471859200B, 471859200/512 = 921600 blocks = E1000 (hex)
- part_ab/debian-stretch-visionsom-6ull.002 - size 361758720B, 361758720/512 = 706560 blocks = AC800 (hex)
Go to u-boot and enter this command to download and write first part (note that you have to change IP address to your host PC address, change part_aa to debian-stretch-visionsom-6ull.001 if you are on Windows, and change E1000 value if your file has different size):
setenv serverip 192.168.0.111; setenv bootfile part_aa; dhcp; mmc write $loadaddr 0 E1000
In the mmc write command we passed three parameters:
- $loadaddr is address of downloaded file in RAM
- 0 is number of the first 512B block that will be written (as hexadecimal)
- E1000 is number 512B blocks to write (as hexadecimal)
To write the second part we need to pass different start address (note that you have to change IP address to your host PC address, change part_ab to debian-stretch-visionsom-6ull.002 if you are on Windows, and change E1000 and AC800 values if your files have different sizes)
setenv bootfile part_ab; dhcp; mmc write $loadaddr E1000 AC800
After this operation is complete you can reboot your board.