VisionSTK-6ULL-NFC – how to use NFC with VisionSOM-6ULL
From SomLabs Wiki
VisionSTK-6ULL-NFC – how to use NFC with VisionSOM-6ULL
This article is intended to show Linux early adopters easy and fast way how to start using NFC (Near-Field Communication) technology with VisionSOM running Linux.
Prerequisites
This tutorial is based on a pre-prepared image for VisionSOM-6ULL module. The image is available here: SoMLabs-VisionSTK-6ULL-NFC-v1.zip.
For testing purposes use user root and blank password.
Then you need to write the image file to microSD card. More information you can find in manuals: How to prepare SD Card with Debian 9.2 for VisionSOM-6ULL on Linux or How to prepare SD Card with Debian 9.2 for VisionSOM-6ULL on Windows. Please remember to use a proper image file: SoMLabs-VisionSTK-6ULL-NFC-v1.zip.
Additionally, the VisionSTK-6ULL-NFC kit is needed to perform the actions described in this article. The kit contains:
- VisionCB-6ULL-STD v.2.0 (Carrier Board)
- VisionSOM-6ULL P/N: SLS16Y2_792C_512R_SD_0SF_C (System on Module)
- SoMLabs 4ch PullUpper
- OM5578/PN7150ARD (PN7150 NFC Controller, NFC Forum Type 2 Tag)
- All necessary cables
The VisionSTK-6ULL-NFC kit is only available in the Mouser store. More information on the Mouser website.
Hardware set-up
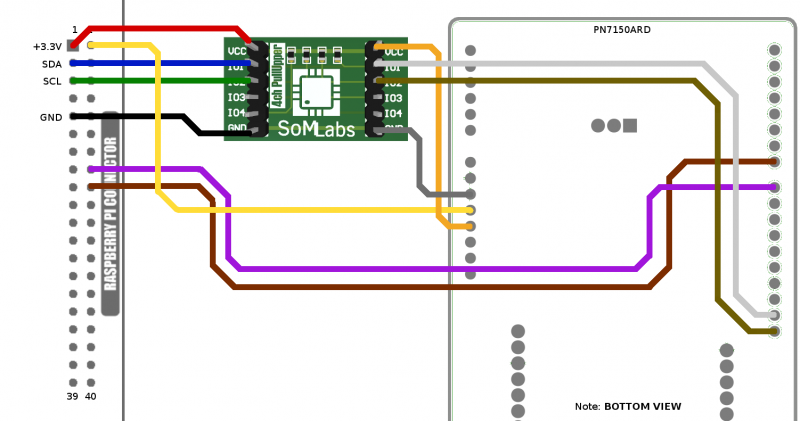
PN7150 boards do not have I²C pull-up resistors. Use the SoMLabs 4ch PullUpper board to connect the I²C bus and control signals to the NFC controller board, as shown below.

Software set-up
In addition to power and the I²C bus connections, PN7150 NFC controllers use two additional control signals:
- VEN – controls low power mode;
- IRQ – indicates there is new data to be read by the host processor.
IRQ and VEN signals are connected to GPIO8 and GPIO9 on VisionCB. These GPIOs are also connected to push buttons. A 'gpio-keys' keyboard device is set up in the default device tree, which blocks these I/Os from being used by the NFC library. Thus, the GPIO keyboard needs to be disabled by specifying a different device tree file to be loaded during boot. Type in reboot in the console to restart the system.
root@localhost:~# reboot
Press any key to interrupt the count-down and enter u-boot prompt:
U-Boot 2016.03-21154-g27a1dbf-dirty (Apr 11 2018 - 22:39:28 +0300)

CPU:   Freescale i.MX6ULL rev1.1 69 MHz (running at 396 MHz)
CPU:   Industrial temperature grade (-40C to 105C) at 38C
Reset cause: POR
Board: SomLabs VisionSOM 6ULL
DRAM:  512 MiB
MMC:   FSL_SDHC: 0
Display: TFT43AB (480x272)
Video: 480x272x24
In:    serial
Out:   serial
Err:   serial
switch to partitions #0, OK
mmc0 is current device
Net:   FEC0 [PRIME]
Warning: FEC0 (eth0) using random MAC address - a6:0c:2d:96:6c:5a

Normal Boot
Hit any key to stop autoboot:  0
=>
u-boot environment variables control how u-boot initializes the boot memory, loads individual parts of the firmware (kernel, devicetree, optionally an initial ramdisk) and boots the Linux kernel. To print the entire environment, or just a single variable, use printenv:
=> printenv
=> printenv fdt_file
fdt_file=somlabs-visionsom-6ull-nfc.dtb
fdt_file sets the file name of the device tree to be loaded from /boot in the root filesystem. Use setenv to change its value:
=> setenv fdt_file somlabs-visionsom-6ull-nfc.dtb
Alternatively, you can edit the fdt_file variable (may not work correctly with some terminal emulators):
=> editenv fdt_file
edit: somlabs-visionsom-6ull-nfc.dtb
To make the change permanent between reboots, store the new environment on the SD:
=> saveenv
Saving Environment to MMC...
Writing to MMC(0)... done
=>
You can now safely reset the board.
Reading tags
You can read the tag by using the tag_read function. Compile the program in the /root/libnfc-nci-demos/tag_read directory
root@localhost:~# cd ~/libnfc-nci-demos/tag_read
root@localhost:~/libnfc-nci-demos/tag_read# make
Then run the program.
root@localhost:~/libnfc-nci-demos/tag_read# ./tag_read
Once you place the included NFC Sample Card close to the antenna, its contents will show up in the console:
 Tap a tag to read; press Return to quit
Tag arrived, UID: 043bbaaa286380
Text record: Hello!
Tag departed
To terminate the program, press Ctrl+C.
Writing tags
You can write a new NDEF record to the tag using the tag_write function. It can write information onto the included NFC Sample Card:
root@localhost:~# cd ~/libnfc-nci-demos/tag_write
root@localhost:~/libnfc-nci-demos/tag_write# make
root@localhost:~/libnfc-nci-demos/tag_write# ./tag_write ”Hello!”
Use the -u switch to write an URI instead of a text record, e.g.:
./tag_write -u ”http://somlabs.com/”
./tag_write -u ”mailto: somlabs@somlabs.com”
Exchanging NDEF messages with a smartphone (P2P mode)
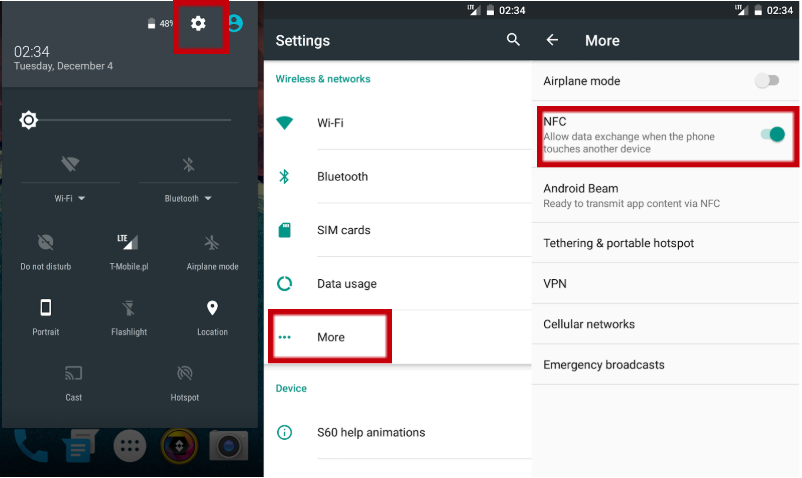
P2P mode allows two active devices to exchange NDEF messages. Instead of one device reading the other's memory, P2P mode uses SNEP (Simple NDEF Exchange Protocol) to send and receive messages. During a session, the device which has data to send is the Server, while the one ready to receive it is the Client. Enable NFC in your Android smartphone, select: Settings → More → NFC

SNEP Server
Run the following commands in the Linux console to build this example:
root@localhost:~# cd ~/libnfc-nci-demos/snep_send
root@localhost:~/libnfc-nci-demos/snep_send# make
Just like writing tags with tag_write, you can send text and URI records over a SNEP connection:
./snep_send "This is a text record."
./snep_send -u "http://somlabs.com/"
This example also allows you to push arbitrary MIME data through SNEP:
./snep_send -m ”image/png” ../common/nxp.png
Once you tap your smartphone to the antenna, Android will determine the correct action depending on the record type or MIME media type. Text records open in a system dialog on most phones, while URI records launch the web browser.
SNEP Client
snep-receive implements a SNEP client that prints the received NDEF record to standard output, just like tag_read:
root@localhost:~# cd ~/libnfc-nci-demos/snep_receive
root@localhost:~/libnfc-nci-demos/snep_receive# make
root@localhost:~/libnfc-nci-demos/snep_receive# ./snep_receive
Open any web page in the browser on your phone. With the page on the display, move the phone close to the NFC antenna. Confirm 'beaming' of the currently displayed content by tapping anywhere on the screen. The address of the web page should appear in the console.
root@localhost:~/libnfc-nci-demos/snep_receive# ./snep_receive
Tap a device; press Return to quit
Received 17 bytes
https://somlabs.com/